PCB layout
Design Rules and Net Classes
On this page
Design rules express the manufacturing limits and the routing constraints of the active board. Set them before routing; routing, DFM/DRC, and the AI layout all read the same rules.
Open the Design Rules Manager#
With a PCB active, select View → Design Rules. The Design Rules Manager window has five pages — Net Classes, High-Speed, Stackup, Constraints, and Assignment — and a Fab: … chip that shows which manufacturing preset is in use (hover it for the numbers).
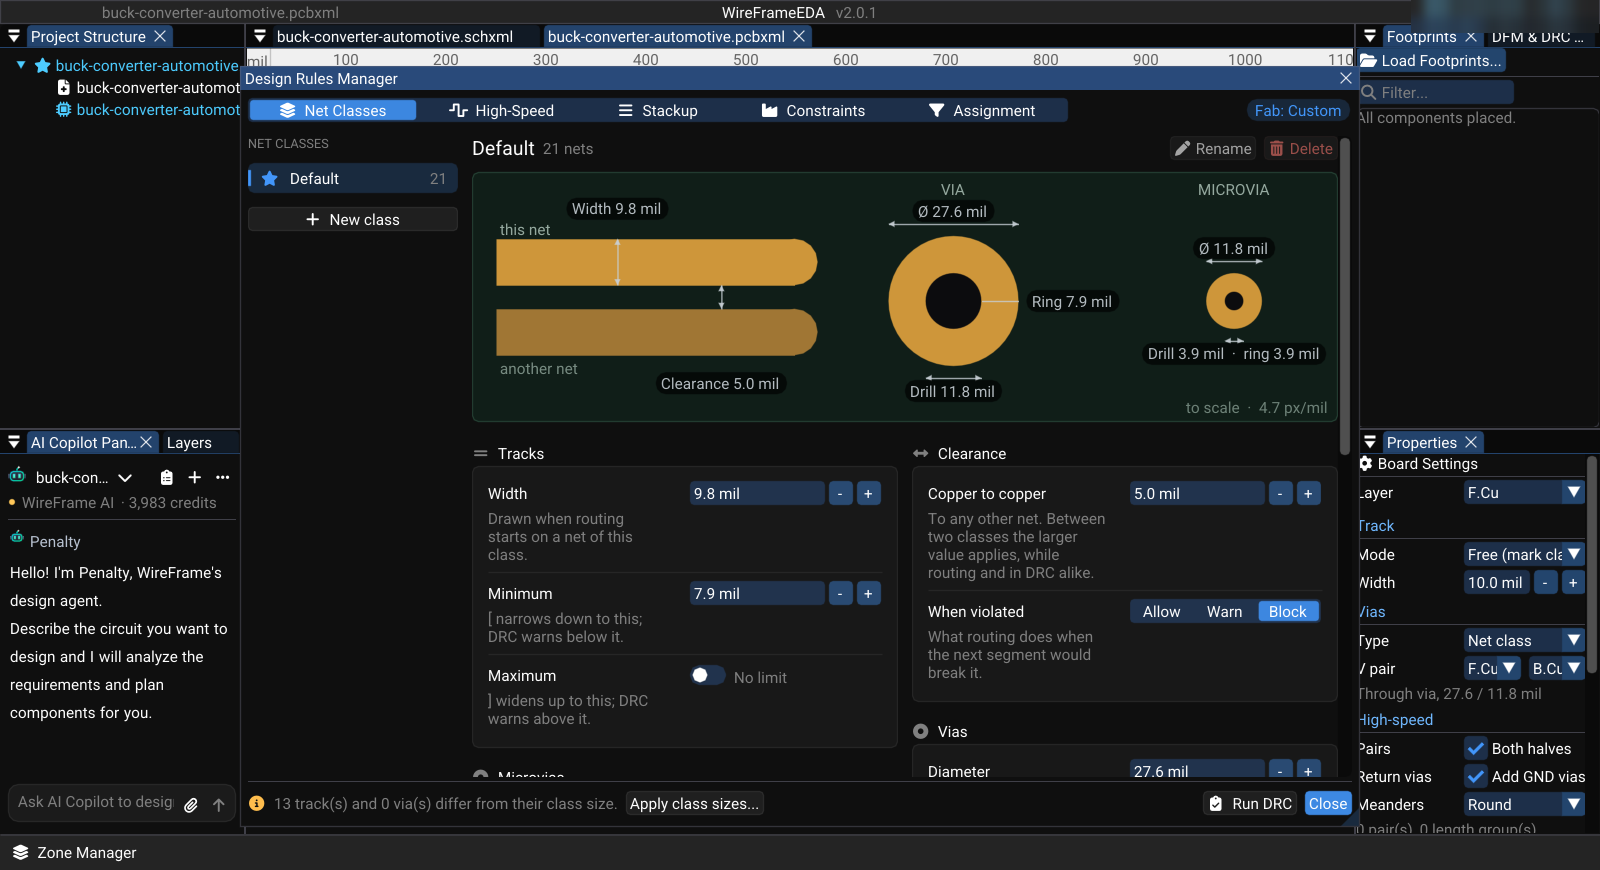
At the bottom of the window:
- Routed copper matches its net classes. — or n track(s) and n via(s) differ from their class size. with Apply class sizes..., which resizes routed tracks and vias to their class values after a confirmation (one undo step puts everything back). Widths chosen on purpose — a track necked down to a fine-pitch pin, a wider power run — change too, so review the list first.
- Run DRC opens the DFM & DRC check; Close closes the window.
Constraints — what the board house can make#
Every net class must sit on or above these limits, and DRC reports anything below them as an error.
-
Under Start from, pick a preset or Custom:
Preset For Track / clearance Via diameter / drill Relaxed Home etching, CNC milling, or the safest order 10 / 10 mil 47 / 23.6 mil Standard Typical pooled 2–6 layer prototype service 5 / 5 mil 18 / 10 mil Fine pitch 0.4 mm BGA / QFN fan-out 3.5 / 3.5 mil 15.7 / 7.9 mil HDI Laser microvias, stacked or staggered 3 / 3 mil 15.7 / 7.9 mil -
Adjust the cards to your manufacturer's published capability:
- Copper — Minimum track, Minimum clearance (also the floor routing and DRC use between any two nets), Copper to board edge;
- Drilling — Via diameter / drill, Microvia diameter / drill, Annular ring (vias and through-hole pads), Hole to hole, Mounting hole (the diameter Place Mounting Hole uses).
- If a card Net classes below these limits appears, fix the classes or select Raise them to the minimum.
Do not copy "typical" internet values into a production board. Use the current fabricator's capability and keep a margin.
Net Classes#
The left column lists the classes; Default (star) is what every net falls back to and cannot be renamed or deleted. A new board has Default and Power; a board imported from KiCad has the classes its project defined — the buck converter in the pictures has only Default. Hover a class to see how many nets use it.
- New class creates a copy of the selected class; Rename and Delete act on the selected one. Nets, rules, and tracks follow a new name.
- Each class has these cards:
| Card | Fields |
|---|---|
| Tracks | Width (drawn when routing starts on a net of the class), Minimum ([ narrows to it), Maximum (] widens to it) |
| Clearance | Copper to copper (between two classes the larger value applies), When violated — Allow, Warn, or Block (default); see Routing |
| Vias | Diameter, Drill, Annular ring (worked out for you), Type used when the routing via mode is Net class |
| Microvias | Diameter and Drill of laser-drilled microvias |
| Impedance | Single-ended Z0 and Differential Zdiff targets, Pair gap; Use that width / Use that gap fill in the values that hit the target on the current stackup. DRC rule W13 compares the routed width |
| Routing & length | Preferred layer (routing from a through-hole pad starts on it), Target length and Tolerance (DRC warns outside them), Max skew within a differential pair |
A value below the board's constraint is flagged under the field.
Assignment — which net gets which class#
Rules by net name are checked top to bottom and the first match wins. Each rule is a pattern (starts with, contains, or is exactly) and a class; use the arrow to check a rule earlier, and Add to create one (e.g. GND, USB_, +). A new board starts with contains GND → Power, contains VCC → Power, and starts with + → Power; an imported board starts with no rules. Type a name under Try a net name to see which class it would get.
Every net lists each net with its Class and Because (the rule that matched). Choosing a class here is a manual assignment, marked Manual, and overrides every rule; Reset returns the net to the rules. Use Filter nets to find one.
High-Speed and Stackup#
- High-Speed — Detected from net names suggests differential pairs and groups from names such as
USB_D+/D-,ETH_TX_P/N,DDR_DQ0,QSPI_IO0,*_CLK,RF_ANT, with a target and confidence; accept the ones you want. Differential pairs (Add pair) and Length-matched groups (Add group) can also be declared by hand. Routing and length tuning use them — see Routing. - Stackup — Board build: Confirmed (until you confirm your board house's stackup, every impedance number is marked assumed), Copper layers, εr (dielectric), Outer layer to plane, Plane to plane, Copper outer / inner, Board thickness. Your net classes on this stackup shows the impedance each class gets, and the Impedance calculator (Single-ended, Differential, Coplanar) solves width or gap for a target and can Apply the result to a class.
Verify the effect#
While routing, the readout near the cursor shows the class, width, clearance, and violation handling of the net. Selecting a track shows its net and class in Trace Properties.
What changes existing copper, and what does not:
- Changing a class's values (width, via size) leaves the tracks already drawn alone. The footer counts how many tracks and vias differ from their class size; Apply class sizes... resizes them all, in one undo step, after asking.
- Moving a net to another class (a manual choice under Every net, or Reset) resizes that net's tracks and vias to the new class at once, in one undo step. Pick the width before you reassign: on the buck converter, putting
+5Vinto a 20 mil class narrows its 1 mm input track and widens its 0.25 mm feeds, and DRC then reports six clearance errors around the inductor. Ctrl+Z undoes it.
After either change, rerun DFM/DRC.
Release checklist#
- Constraints match the selected manufacturer's current capabilities.
- Critical nets resolve to the intended class (Assignment → Every net).
- Manual assignments are intentional.
- Existing tracks and vias comply after every rule change.
- DFM/DRC has been rerun on the saved release revision.