PCB layout
Routing Traces
On this page
- Starting a Route
- Drawing a trace
- Route Modes and Clashes
- Route Assist
- Vias — Switching Layers
- Changing layer while routing
- Placing a via by itself
- Via properties
- Mounting Holes
- Editing Existing Traces
- The trace context menu
- Consolidate Collinear Trace Segments
- Routing Several Traces Together
- Length Tuning and Differential Pairs
- AI-Assisted Routing
- See Also
Trace routing connects pads on the PCB with copper paths under the board's design rules. This page covers drawing traces, changing layer through vias, mounting holes, and editing finished routes.
Starting a Route#
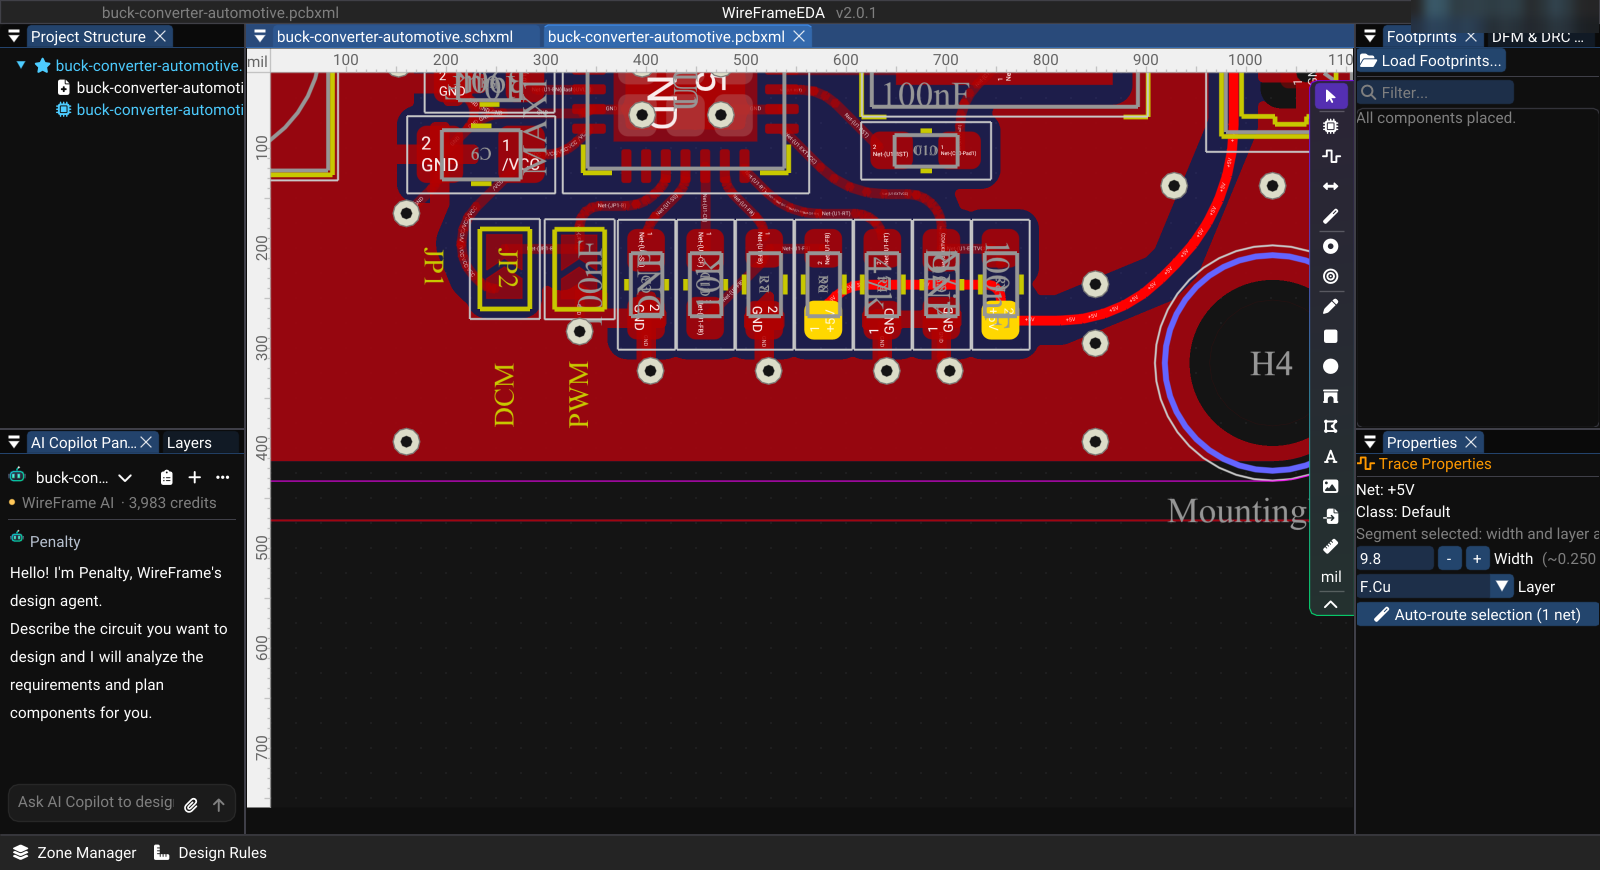
Press X or click Route Trace on the PCB toolbar (the vertical toolbar on the right edge of the canvas).
Drawing a trace#
- Click a pad (or an existing trace or via) to start. The trace takes the net of what you clicked and the width of that net's class. Starting from a track continues on that track's layer.
- Move the cursor. WireFrame previews the next leg with 45° or 90° steps, with corners rounded or mitred in the style set under Properties → Board Settings → Corners. / flips the corner order (which way the 45° step goes first). The preview is exactly what a click lays — the same leg, snapped to the same point; inside a pad or via of the same net, the cursor snaps to its centre.
- Click to commit each waypoint. Backspace steps the route back one waypoint — the followers of a bus and any via dropped at that point included.
- Click the destination pad to finish — or a trace of the same net, which joins the new trace to it. When the pad is on another copper layer, a via is dropped at the last point and a 45° leg reaches the pad on its layer. Double-click anywhere finishes the connection: a clean straight, 45° or L-shaped leg to the nearest pad of the net the trace does not reach yet, or, when there is no clean leg, Route Assist for that connection only. The ratsnest line disappears once the connection is complete.
- Esc ends the track and keeps the route tool, ready for the next one; a second Esc leaves the tool. Picking another tool mid-route ends the route the same way — it is always one undo step.
| Action | Input |
|---|---|
| Start on a pad, trace, or via | Click |
| Commit a waypoint | Click |
| Step the route back | Backspace (also takes back a via dropped at that point) |
| Finish on the destination pad | Click the pad |
| Finish the connection from here | Double-click |
| End this track, keep routing | Esc (a second Esc leaves the tool) |
| Flip the corner order | / |
| Thinner / wider trace | [ / ] (1 mil per press, within the net class limits) |
| Change layer (drops a via) | V, Tab, or Space — see below |
| Route the net under the pointer | Ctrl+Shift+W with nothing selected |
Routing keys only act while a route is running and never from a text field: Backspace does not delete the track you started from, and Space does not rotate a footprint that is still selected.
While you route, a small readout near the cursor shows the net, its class, the layer, the width, the clearance, how violations are handled, the routed length so far, and the keys that apply. For a net with high-speed rules it adds the return path, the plane edge and crosstalk of the track being drawn — see High-Speed checks.
Route Modes and Clashes#
Properties → Board Settings → Track → Mode chooses how a click behaves:
| Mode | What happens |
|---|---|
| Free (mark clashes) (default) | The track goes exactly where you draw it. Anything it comes too close to — another net's track, pad, via, hole or the board edge — is measured on its real shape and drawn as you route, and DRC reports it afterwards. Nothing is refused, and nothing slows down on a dense board |
| Walkaround | Each click searches for a way around obstacles. Slower on dense boards |
| Shove (push tracks) | As Free, and the tracks of other nets in the way are pushed off by their clearance — the preview draws them where they will go before you click. A pushed track keeps its ends and its 0/45/90° shape, and pushes the tracks behind it in turn (a few deep). Pads, vias, a track that crosses yours, a track tied to a pad inside the clearance and your own route's copper are never moved: then nothing moves, the leg is laid as in Free and the clash is marked, with the reason beside it. The route and every track it pushed are one undo step |
How a clash is drawn follows the net class setting Design Rules → Clearance → When violated:
| Setting | Preview colour |
|---|---|
| Block (default) | Red — the segment is still laid; DRC reports it as an error |
| Warn | Amber — laid and marked |
| Allow | The layer's colour |
A route ends with a hint such as too close to other copper · right-click › Reroute Clashing Tracks. Fix clashes with Route Assist, by moving the copper, or by changing the rule. Dragging a routed segment is never stopped by clearance either; its clashes are drawn the same way.
Ending a route on a pad of a different net is allowed — a pad or via of another net is a waypoint, not an end — and DFM/DRC reports the short. Always run DFM & DRC after routing.
Route Assist#
Route Assist routes for you, on the board as it is, and applies the result as one undo step. It runs in the background (Esc stops it) and only touches the nets you gave it.
| Command | Where | What it does |
|---|---|---|
| Auto-route Net / Auto-route Bus | Right-click a track; the Auto-route button on the PCB toolbar; Ctrl+Shift+W | Lays what is still ratsnest on the selected net(s), around every other net's copper |
| Auto-route with nothing selected | Ctrl+Shift+W | Routes the net under the pointer |
| Reroute Track(s) | Right-click a track | Takes the selected tracks up and routes their nets again, clear of everything else |
| Reroute Clashing Tracks (N) | Right-click a track | Reroutes only the tracks of these nets that are too close to another net's copper |
| Double-click while routing | Canvas | Finishes one connection (see above) |
Route Assist reads the board's design rules and stackup, and joins at track ends inside pads. Review its copper like your own, and run DRC.
Vias — Switching Layers#
A via is a plated hole that connects copper layers so a trace can change layer.
Changing layer while routing#
| Key | Via goes to |
|---|---|
| V, Tab, or Space | The other layer of the via pair (F.Cu ↔ B.Cu by default) |
| = / - (or keypad Num + / Num -) | The next / previous copper layer of the stackup |
| Page Up / Page Down | F.Cu / B.Cu |
| Shift+V | A layer you pick from a list |
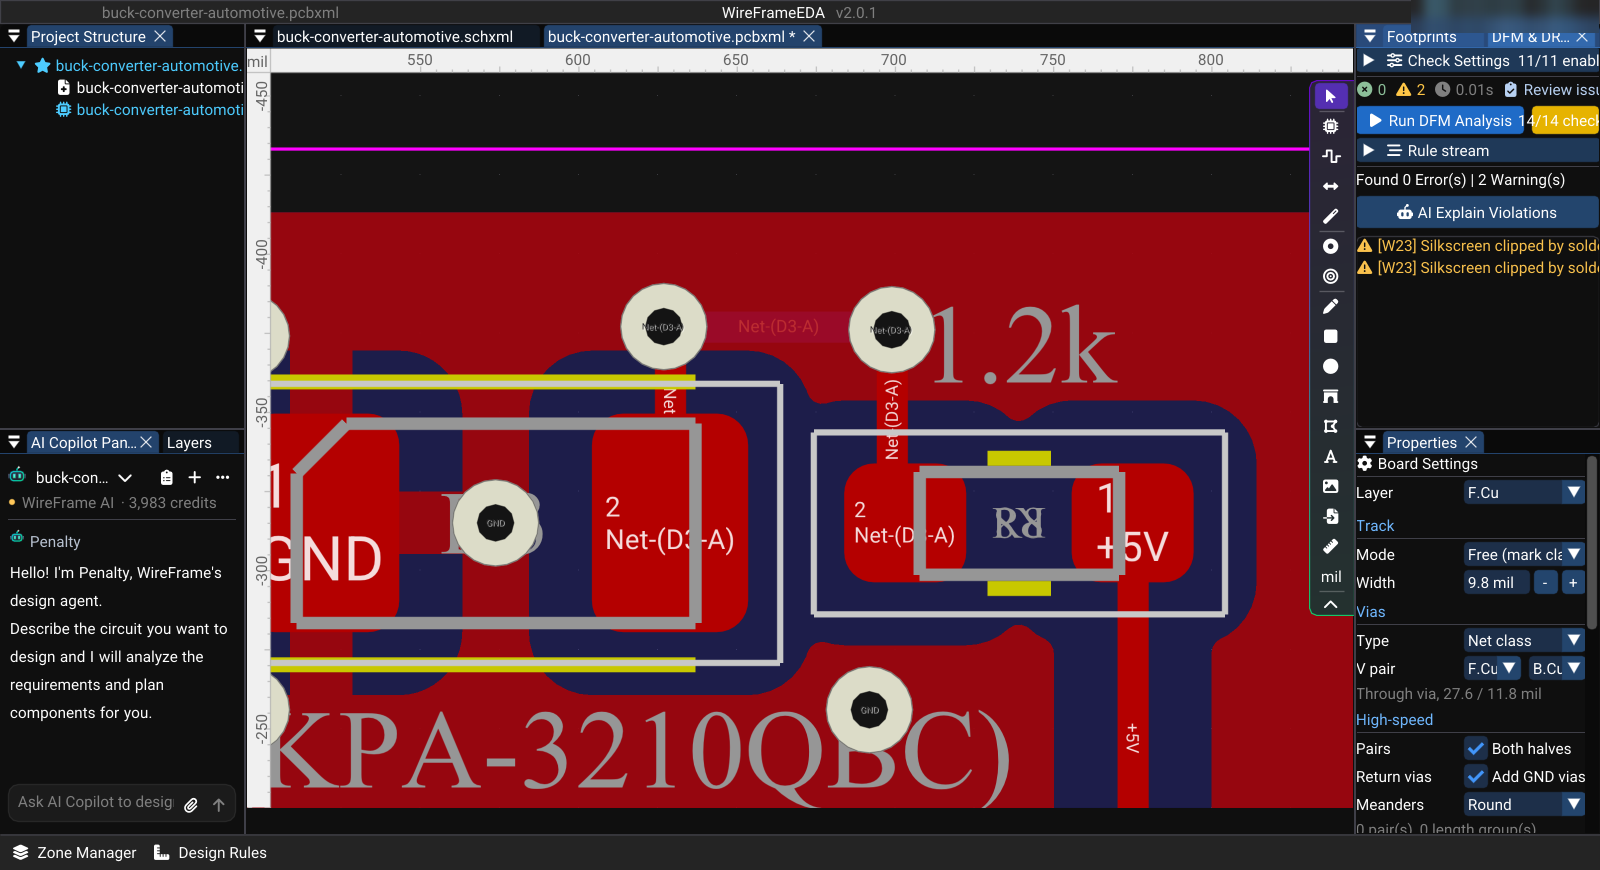
The via is dropped at the last waypoint and routing continues on the new layer. Move away from the start point first — a via cannot be dropped on it. The via type (through, blind/buried, or micro) follows Properties → Board Settings → Vias → Type, which defaults to the net class.
Placing a via by itself#
- Select Place Via on the toolbar (V when not routing).
- Click on the board. On a track's centre line the via lands on it and takes its net; elsewhere it snaps to the grid and takes the net of the pad under the cursor. If it lands too close to another net, the tool says so at once.
Via properties#
Select one or more vias to edit them in Properties. Edits apply to every selected via.
| Field | Description |
|---|---|
| Lock | Locked vias cannot be moved or deleted |
| Type | Through, Blind/Buried, or Micro, with the layers it spans |
| Diameter / Drill | Copper pad and hole size; Ring shows the annular ring left around the hole |
| Reset to net class | Takes diameter and drill from the net class in Design Rules |
Mounting Holes#
Use Place Mounting Hole (H) for holes such as screws and standoffs:
- Select the tool and click on the board.
- Select the hole and set it in Properties → Hole Properties:
| Field | Description | Example |
|---|---|---|
| Diameter | Hole diameter, in mil with the mm value beside it | 3.2 mm for M3 screws |
| X / Y | Position | |
| Plated (PTH) | Copper-plated hole | Usually off |
| Net | Net of a plated hole (shown when Plated is on) | GND |
Editing Existing Traces#
| Operation | How |
|---|---|
| Select a segment | Click it |
| Select a whole net | Double-click a trace — every trace and via of that net is selected and highlighted |
| Move | Drag the selection, or nudge it with the arrow keys (5 mil per press) |
| Delete | Del, or right-click → Delete Segment(s) / Delete Track(s). The ratsnest reappears |
| Change layer, width, or corners | Right-click → Edit (below), or Properties → Trace Properties → Layer |
Moving a via or a footprint keeps the attached trace endpoints connected.
The trace context menu#
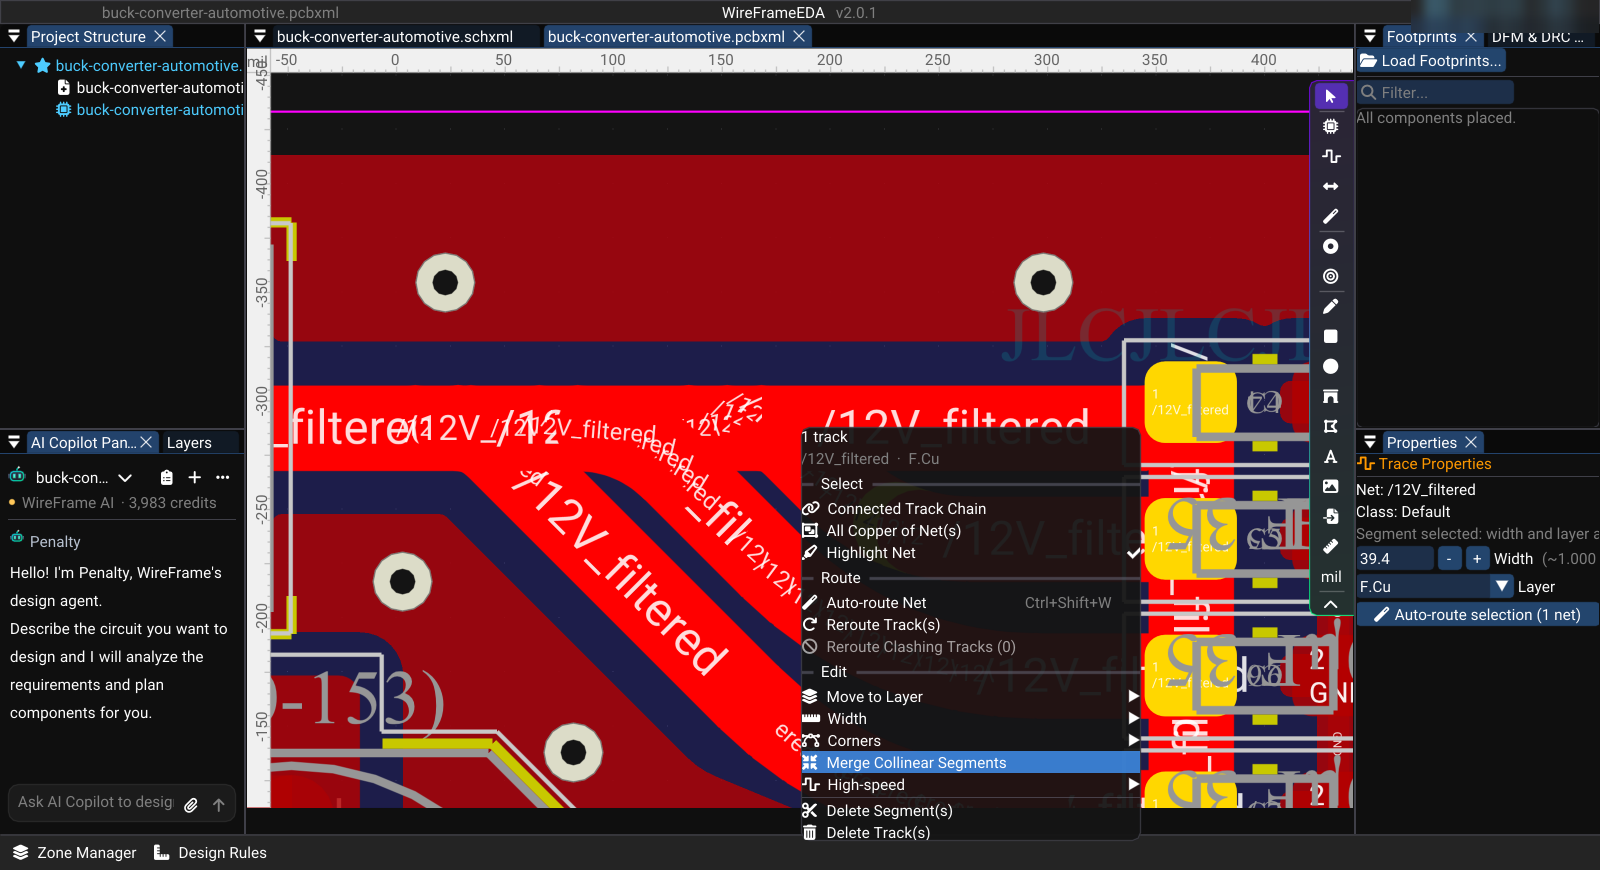
Right-click a selected trace:
| Group | Item | What it does |
|---|---|---|
| Route Assist | Auto-route Net / Auto-route Bus, Reroute Track(s), Reroute Clashing Tracks | See Route Assist |
| Select | Connected Track Chain | Every track joined end-to-end to the selection, through vias, up to the pads |
| All Copper of Net(s) | Every track and via of the selected nets | |
| Highlight Net | Highlights the net on the canvas | |
| Edit | Move to Layer ▸ | Moves the selected tracks to another copper layer |
| Width ▸ | Type a width and Apply, or use Net class width or Match widest | |
| Corners ▸ | Set a radius, then Miter 45° or Arc | |
| Merge Collinear Segments | Joins pieces that continue along the same line | |
| Bus (several parallel tracks) | Distribute Evenly | Keeps the two outer tracks and spaces the ones between evenly |
| Pack to Top / Left, Pack to Bottom / Right | Closes the gaps to width + clearance toward one side; ends on pads stay put | |
| Set Pitch ▸ | Centre-to-centre spacing from the top or left track | |
| High-speed ▸ | Tune length, pairs, and groups | See Length tuning and pairs |
| Delete Segment(s) / Delete Track(s) | Removes the selected segments, or whole tracks |
Review clearance after every group operation and re-run DFM.
Consolidate Collinear Trace Segments#
After routing, select the segments, right-click, and choose Edit → Merge Collinear Segments to remove boundaries between pieces that continue along the same line. It does not simplify zig-zags or redesign the route; use Corners ▸ to round or mitre corners instead. Inspect the result and re-run DFM/DRC.
Routing Several Traces Together#
Select two or more existing traces, choose Route Trace, and click one of the selected traces to continue them all at once. The other traces follow in parallel at their current spacing. When the leading trace lands on its pad, each follower lands on its own pad — with a clean leg, or with Route Assist when a clean leg would clash — and the whole bus is one undo step. Backspace steps all of them back together.
Length Tuning and Differential Pairs#
Routing a declared pair routes both halves together; meanders add length where a net is short against its pair, its group or its target; a live gauge shows the difference while you route. See Length Tuning and Differential Pairs.
AI-Assisted Routing#
The AI Copilot can propose placement and routing for the whole board with /layout. Proposals run on a copy and change nothing until you apply them. See Placement and Routing Assistant.
See Also#
- Footprints & Placement — place footprints before routing
- Layers & Views — manage layers during routing
- Zones & Planes — copper fills interact with trace clearances
- Design Rules & Net Classes — configure clearance and trace width rules
- DFM & DRC — check clearances and widths after routing
- Length Tuning & Differential Pairs — pairs, groups and meanders
- High-Speed Workbench — impedance, return path, crosstalk and power on the routed copper
- Placement and Routing Assistant — AI-assisted placement and routing review